Sage People Recruit uses Salesforce sites. This lets you host public facing Agency and Candidate Portals for advertising vacancies and accepting agency submissions and candidate applications.
One site can serve the Visualforce pages you require for both Agency Portals and Candidate Portals. Or you can set up multiple sites to serve different portals.
The Agency Portal lets recruitment agencies enter and submit candidate details for vacancies you hold on your Sage People Talent Acquisition system. The system associates candidates they submit through the Portal with the recruiting agency’s details. The Agency Portal is a web address holding a form for the agency to complete and submit. A Salesforce site enables this. You can add formatted text and Images to your Agency Portal pages using the Recruit Noticeboard.
Resolution
The URL for your site is in the form: http://xxxx.my.salesforce-sites.com/yyyy
xxxx is your organization's My Domain subdomain and yyyy is the URL path for your site.
To set up a site for your agency or candidate portals:
-
Go to the Sites setup page:
Go to Setup. In Quick Find, enter Sites.
-
Salesforce creates a site domain automatically using your organization's custom domain. If you haven't done so already, read and accept the Salesforce Sites Terms of Use. Select Register My Salesforce Site Domain.
- Select New.

-
Salesforce displays the Site Edit page.

-
Give the site a Label and optional Description. The Name field generates automatically from the label.
-
In the Default Web Address field, enter the URL path for the site. For example, "talent". This is the public URL external users will use to access your site.
-
Mark the site as Active to make it available. If you're not ready to publish the site, you can edit the site later to make it active.
-
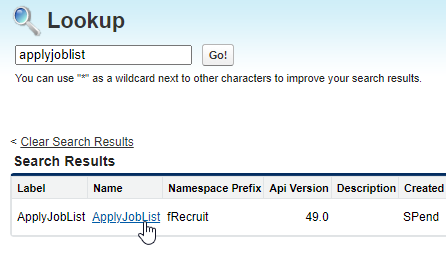
For the Active Site Home Page, select the Visualforce page for the site. Select Lookup
 and search for the site page:
-
ApplyJobList for a Candidate Portal
-
AgencyJobList for an Agency Portal
Use the default page unless you've created an alternative. If you use the same Site for both Candidate and Agency Portals, select ApplyJobList. This is because agencies typically access the site using a link specific to the agency.
-
-
Deselect the option Lightning Features for Guest Users. Candidates and Agency sites don't require this feature.
-
Leave the other fields set at their defaults unless you need to adjust advanced settings for the site.
-
Select Save.
Sage People displays the Site Details page for the site you've created.
Configure Visualforce page access
Next we must configure Visualforce page access to make site template pages accessible through this site.
On the Site Details page for the site you've created:
-
In the Site Visualforce Pages Related List, select Edit.
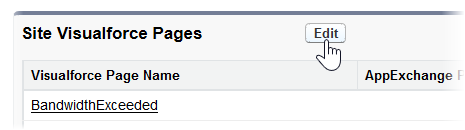
Sage People displays the Enable Visualforce Page Access page.
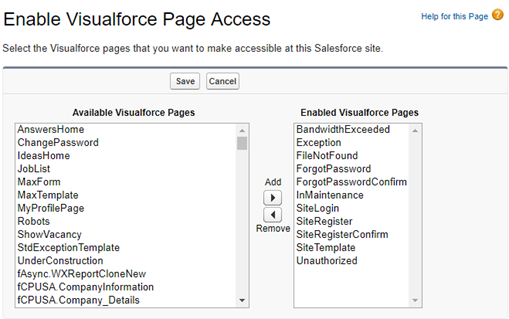
-
the system enables several Visualforce pages for you when you create the site. Check these pages are in the list of Enabled Visualforce Pages:
-
Exception
-
FileNotFound
-
ForgotPassword
-
ForgotPasswordConfirm
-
InMaintenance
-
SiteLogin
-
SiteRegister
-
SiteRegisterConfirm
-
SiteTemplate
-
Unauthorized
If any you require or your custom Pages are missing, select them in the Available Visualforce Pages panel. Then select Add to move all the selected pages to the Enabled Visualforce Pages panel. Select Save.
Sage People redisplays the Site Details page.
-
Configure guest user access
Next configure public access settings to allow guest users to access this site.
On the Site Details page for the site you've created:
-
-
Select Public Access Settings:
Sage People displays the User Profile created for your site.
-
Select View Users.
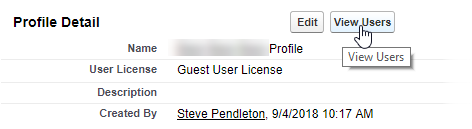
Sage People displays the Site Profile page.
-
Select the name of the Site Guest User.
Sage People displays the Site Guest User Detail page.
-
Scroll down to the Permission Set Assignment Related List and select Edit Assignments.

Sage People displays the Permission Set Assignments page for the Site Guest User.
-
Select the Permission Sets you want to assign to the Site Guest User in the Available Permission Sets panel. Select Add to move them to the Enabled Permission Sets panel and then Save. Select:
- Sage People Agency Portal if you use this Site for Agency Portals
- Sage People Candidate Portal if you use this Site for Candidate Portal
- Both Permission Sets if you use the Site for Agency Portals and Candidate Portal
Sage People displays the Site Guest User Detail page.
-
-
Ensure you give any additional fields you want to display on the portal read access through the Guest User Profile. "Additional fields" are those you don't give read access to through the Permission Sets we supply. Include other fields we supply, or any custom fields you added to your org and included in a field set the portal uses.
Your site setup is now complete. User can access and the site using the URL you defined.